Monday, July 9, 2012

Cheese-Stuffed, Bacon-Wrapped BURGERS!!

As many of you know and have probably experienced for yourselves, I've been a little obsessed with the Pinterest.com website.  I simply love the fact that I can look at a huge variety of ideas on there and on other websites and organize them how I might want to use them.  I have a pin-board on there called Nom Nom.  This is where I pin the ideas for recipes that I want most to try or that I have tried (some of my recipes from this blog have made it there). Well, this recipe was inspired by a pin from Pinterest.com, although I had to make lots of little changes because of my time constraints etc.

Today I was running errands with my mom and we were discussing dinner as we went.  We couldn't figure out what to make.  Originally we thought to make a homemade mac and cheese (I really want to try a quinoa one) and some veggies, but the day was hot and we were running late and out of time.  So I thought that I would try these burgers.  All our ground meat at home was frozen and we didn't have buns so we made a quick stop at the grocery store (where I also got some brie cheese for my burger and some bacon for wrapping) to pick up what we needed. Here is what I used:

President's Choice Prime Rib Burger patties (they come 8 to a box but we just used 4)
Brie cheese
Cheddar cheese (my dad isn't really into the fancy cheeses much)
Regular bacon (perhaps using turkey bacon would be a good alternative)
Whatever burger condiments you'd like (we had lettuce, tomatoes, purple onions, avocado and your run of the mill things like mayo, ketchup, mustard etc)

Once I had the patties thawed (about 5 minutes on an auto defrost in the microwave), I put a 1 inch cube of cheese in the middle (okay, if we are being truthful, I may have gone a little bigger than that) and then molded the patty around the cheese so that no cheese was showing and patty seemed even.

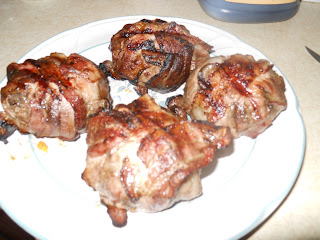
Next I wrapped each burger with 4 pieces of bacon, going in a criss-cross pattern to help it all stick and to make sure the coverage of the beef was even (I think you could use turkey or chicken or even salmon for the burgers if you wanted... hm... some interesting ideas popping into my head).

Then I popped those bad boys onto a hot BBQ grill because, let's face it, everything tastes better in the summer when it's grilled!!  They take longer than a regular burger to cook, so be patient and try to give the grill a coating of Pam or olive oil at the start to help with the sticking.  Make sure you monitor your burgers because the fat dripping off the bacon will cause the flames to flare!!

Lastly, I laid out the condiments and built my giant tower of goodness!!  The burgers were fantastic but a little tall... I think next time I will try to find a way to flatten them out a little more by spreading the cheese out instead of having a brick of cheese.


Best thing about this is that the possibilities are endless for meat and cheese combinations: blue cheese and beef, brie and turkey, cheddar and turkey, cheddar and beef, mozzarella and beef, mozzarella and chicken... endless!!! 

HAPPY EATING!

Friday, May 25, 2012

Fancy and Simple

Yesterday as I was meant to be working diligently on my reports while on a planning period I let my mind wander (those of you who are teachers or work full-time probably have this happen from time to time too... shoot I'm sure it happens to everyone!).  Anyway, I began to think about what in the world I was going to make for dinner.  I looked at my pinterest board and didn't feel inspired (this is now a rare thing) and I certainly wasn't inspired to order in or to go to the grocery store for additional ingredients.  So I went to one of those recipe finder sites and plugged in the fact that I had asparagus, fresh green beans, cheese and the like in my fridge.  Several cool recipes popped up but the picture for one amazed me and as I read the simple recipe, I felt inspired.  Of course I made lots of little tweaks but what came out of the oven was beautiful and TASTY!! 

What you need:
Fresh green beans (or not)
Asparagus (or not)
eggs
fresh parmesan cheese
fresh or grated mozzarella cheese
butter
salt
pepper
garlic

I used both the beans and the asparagus but you don't have to.  You can use one or the other really.  I boiled some salted water (I used sea salt) and let the veggies hang out in it for about 4 or 5 minutes and then I strained them.

Then I plopped the veggies into my square pyrex dish, cut a little butter into squares and put that over the veggies as well as some of both kinds of cheese (you can use as little or as much cheese as you like).  Then I added salt, pepper and a little garlic to taste. 

The next step involves melting some butter and putting the eggs (one or two per person) in it to fry a little.  Once the whites set enough for you to move the eggs, then gently move them and place them on top of your veggies. Drizzle any remaining butter over the whole thing and sprinkle some more cheesy goodness on the top before popping the whole thing into the oven for 5 minutes or so at 375/220 degrees.  If you want the yolks on the eggs hard, then bake it a little longer.  I like mine runny so out it came at about 5 or 6 minutes. 

 In the pan...

On my plate...

It was such a simply dish, so tasty and it looks a little fancy.  If I had small gratin dishes for the oven I would have used those as they would have been easier for serving.  With a little rustic bread on the side it is the perfect quick throw together.

Gooey, Gluten-Free Brownies

Okay... I cheated a little in the sense that I used a brownie mix that is imported to Turkey from Germany but I don't know if I've ever had a better mix (even the gooey, gluten laden ones can't match up).  So forgive me.  Once I mixed the batter, I threw in about a cup full of dark chocolate chips for good chocolatey measure and then I spooned part of the mixture into greased muffin tins.  I cut up a Bounty bar into bit sized pieces and stuffed one bit in the middle of each brown cup and baked as directed to on the box.  I don't know if the chocolate bar made it more gooey or what but they were delicious!!!! So get creative with your brownies, people!  It's well worth it.


Sunday, May 13, 2012

Iced Coffee Goodness

So I haven't blogged much lately but it's because I haven't cooked much lately and what I have made I've found on www.pinterest.com, which is a GREAT site.  The recipe I'm sharing with you today is from there but I just HAD to make sure that all my readers saw this... it's so easy, so delicious and fun.

All you do is freeze some of your leftover coffee into ice cubes... I think it'd be fun to use flavoured coffees too but since I didn't have any I stuck to some great west coast grinds I brought to Turkey with me this past summer. 

Once they are frozen throw them into a glass of sweetened (if you like) milk.  I don't drink regular milk anymore so I used almond milk for mine and a little maple syrup to sweeten with.  Super delicious. 

Happy sipping!

Tuesday, March 27, 2012

The Secret to a Juicy Roast Chicken

Nope, it's not a can of beer up the bum... it's really simple... salt and rest!

My friend told me that this was the secret and I've been roasting chickens with a pretty good measure of success for a long time and I didn't know it so I wasn't sure I believed her until I tried it. She was right!

So what you do is, get your whole roasting chicken (thawed) and salt it inside and out, then bag it and throw it in your fridge for about 24 hours (yes, this requires some planning... my friend says she salts and bags all her meats right when she gets them home... a good idea for those busy moms out there).

Once you are ready to cook it, pre-heat your oven to about 375 F or 200 C and make sure to pre-heat your pan with it (this I kinda forgot to do... whoops... I was distracted because I was roasting veggies too), so you can seal in more of the juiciness by searing the skin a little... you will want to flip it over after about 10 minutes so that both sides get the searing... again, I forgot about that part.

I rubbed my chicken with garlic, oregano and cayenne pepper before adding it to the pan.

Once it was done, it was the juiciest chicken ever... I've been using it for meals for the past 4 days and it's still juicy and tasty... and not salty tasting either, which was a surprise.

Happy Eating!

Baked Sweet Potato and Zucchini Fries

I know it's all the rage to do this and I looked a few different recipes and this is what I came up with for my spicy version:

I'm also just one person so my measurements reflect that.

1/2 a peeled large sweet potato cut into wedges or whatever fry shape you like
4 baby zucchinis cut into 1/4s length wise
1/2 cup corn meal (you could use bread crumbs but I went with the corn meal)
1 tsp basil (dried)
1 tsp cayenne pepper
1 tsp salt
1 tsp garlic powder
1/4 cup grated fresh parmesan
1 cup sunflower oil

Okay... I mixed the corn meal, cheese and the spices together in one bowl and I poured the oil into another bowl. I pre-heated my oven to about 400 degrees Fahrenheit or 220 degrees Celsius. The temperature in Fahrenheit is approximate since my Turkish oven doesn't convert it... basically you want a good and hot oven.

Then I dumped my cut up sweet potatoes into the oil and then put them onto a baking sheet so they were just one layer. I did the same with the zucchini except that I then tossed them in the corn meal mixture before laying them out on the baking sheet.

I popped them in the oven for about 10 minutes or until I thought they were crispy and brown (some got a little charred because of the difference in temperature at the back of my oven compared to the front but just 3 or 4 I think).

Then I made a dipping sauce with a little ranch dressing and some chipotle tobasco... spicy and YUMMY!!!

Happy Eating!

Monday, February 13, 2012

Mashed What?!

So I've been recently addicted to Pinterest.com and also to a more healthy and wholesome approach to feeding my body. Now, I still want all the flavour in my meals and I hate to give up favourites like bread or potatoes or stuff like that, but I'm learning that I don't have to give them up altogether. There are some great substitutes out there that are SUPER yummy and healthier. Mashed cauliflower is one such sub for mashed potatoes.

Now, if you know me, you know I love, love, LOVE the creamy, buttery flavour and texture of a mashed potato. I don't make it at home often because it's a lot of work for just one person and, well, I can be lazy when it comes to cooking. So I was a little skeptical that mashed cauliflower could be any good...

Here's what I did:

I cut up and boiled 1 head of cauliflower (way more than one person needs... could do 4 servings for sure).
Once it was soft, I added a pat of butter, about 1/4 cup of cheese (I used mozzarella this time), a few leaves of fresh basil, a dash of salt and a dash of garlic powder. I then used my hand-held blender to blend it all together and what I got was a delicious surprise. The texture was creamy and smooth, the flavour was excellent and I felt like I was getting a treat when I was eating really healthy!

I made it as a side for my salmon (I didn't finish the salmon but went back for more of the mash... *sigh* carbs are always my downfall). I can't wait to make more varieties (like one with garlic and parmesan... or one with ranch seasoning in it and a little butter... or a spicy version with some crispy bacon chunks in it and chipotle seasoning... the varieties are ENDLESS)! Needless to say, I am a convert... it's easy to make and super delicious! Have fun and enjoy!!

Sunday, February 12, 2012

Grown Up Grilled Cheese

I've always loved grilled cheese sandwiches. And, yes, as a kid I LOVED the Kraft processed cheese kind of sandwiches. I loved the crisp, buttery bread with the cheesy inside. But as I've grown up, I've looked for more interesting versions of the same thing. And until recently my favourite kind of grilled cheese was a simple grilled sandwich with smoked Gruyere and thin sliced tomatoes inside.

But this week I got a little creative and this is what I did:


You'll need the following and you can adapt it however you want:

  • bacon (Turkey bacon or regular or not at all if you don't want... I just liked the smokey, salty addition)
  • avocado (about 1/3 per sandwich)
  • fresh purple basil (whole leaves)
  • 2 kinds of cheese (I used white cheddar and Turkish kasar)
  • butter or margarine
  • garlic powder
  • dried dillweed
  • dried oregano
  • dijon mustard
  • cayenne pepper

Okay... I baked my bacon so that it didn't crinkle or curl and was just easier to work with.

I mixed all the dry spices with enough margarine to spread on the slices of bread that I used (whole wheat for me... trying to make it somewhat healthy)


Then I layed one slice of the buttered bread in a pan that wasn't on the heat yet (I like to build my sandwiches before heating so that the cheese gets all melty). I then spread the avocado onto the bread and put on one layer of the cheese. Then I added the basil and bacon and the last layer of cheese. Before I added the last slice of bread I added the dijon mustard to the inside of the bread.

Grilling is a little tricky with something so stacked unless you have a panini press, and I don't so it was tricky but turned out great and made me want to think of a billion different variations! Enjoy!

Amazing Eggplant

In my quest to eat healthier, delicious meals I asked around for some recipes. My teaching partner, Nilay, shared a recipe that her roommate shared with her for cooking eggplant. And of course, I tweaked and played with it in order to come to my own interpretation. :) What can I say? It's just my way.

I used one of the large eggplants and sliced it into 1/3" slices or so. I then boiled and salted some water. I dropped my eggplants into the water to soften them up a bit. I think they sat in there for about 3-5 minutes. While they were boiling away I made the following mix for coating them for the next step of cooking:

1 cup corn meal
1 tsp dried dill
1 tsp dried garlic powder
1 tsp dried oregano
a dash of salt and pepper.

Then I took out my eggplant circles from their water (but I didn't get rid of the water, instead I poured in a little extra virgin olive oil and my pasta) and tossed them in the coating mixture. Once they were well coated, I put them in a hot pan with olive oil and browned them on both sides.

Then I plated the whole mess up and topped the pasta with diced, canned tomatoes. It was delicious and for a leftover, I put the eggplant circles in a container, topped them with the rest of the tomatoes and a slice of cheese (like eggplant parmesan) for heating up at the lunchroom.

It was an excellent, fulfilling and healthy dish. I hope you enjoy!!!

Saturday, February 4, 2012

Beautiful Brunch

Pinterest strikes again (yes... it's official and I have no real life)!! I was browsing on there the other night while waiting for a show I wanted to stream to load. I saw this recipe for avocado eggs and became intrigued so I thought I'd try it on Saturday... so I did (with a few twists of my own of course).

You will need:

1 avocado pitted and sliced into 1/2" slices (keeping the skin on in order to keep the shape)
2 eggs (I made this for one... because it's just me)
olive oil (just enough to cover the pan)
salt (just a pinch)
1 tbsp grated fresh parmesan
Chipotle Tobasco sauce

Let your pan get warm and make sure it's coated with the oil. Put your avocado slices in it and crack and egg in the center of each slice. Sprinkle your salt and tobasco on top and then evenly sprinkle on the cheese. Cover the pan with a lid and let cook until the eggs are done how you like (I like runny yolks so... )

And that's it... it looks impressive, tastes incredible and is just that easy!!


Happy Eating!

Pesto Salmon

I also got this idea from Pinterest... have you discovered this site yet?! It's pretty amazing place to see and share things that you like. I don't always look at the recipes etc in detail, I just look... take my inspiration... then cook!

As my good friend was coming over for dinner and to celebrate our new jobs for the coming school year, I wanted to make something yummy but that was still healthy and within my new goals of eating clean and homemade (the only thing in this that I didn't make from scratch was the pesto... maybe next time though! ;))

For the salmon you will need:

Salmon fillets (we had 2)
Pesto (about 1 tbsp per fillet)
Sliced tomatoes

For the quinoa you will need:

quinoa (rinsed and soaked for about 20 minutes) - I used 1 cup of quinoa so I could have leftovers for a salad the next day
1 small onion (finely diced)
1 buillion of your choice(I used a white wine and herb one I had)
water (for my 1 cup of quinoa, I used 1 3/4 cup water)
a dash of olive oil

For the broccoli you will need:

1 small head of broccoli
salted water for blanching
1 tsp olive oil
2 tsp balsamic vinegar


To cook the salmon you need to pre-heat your oven to 200C or whatever that converts to in F (you're smart... you know how to google that, right?). Lay the fillets out on a piece of foil (that is big enough to make into a pocket around the fillets). Butter them with the pesto and then cover them with the sliced tomatoes. Wrap them in a pocket that is big enough to not let the top touch the salmon and place it in your oven for about 20 minutes.

To cook the quinoa, you need to first heat the oil in your pan, then saute the onions in the oil. Once they have sweat to a transparency, add the quinoa and let that cook in the oil for a few minutes (gives it a nuttier flavour and allows it to soak up the sweetness of the onions). Then add the water and buillion. Bring the mixture to a boil, then reduce the heat, cover and let cook until there is no more water in the pot (about 25 minutes or so).

To cook the broccoli, get your salted water to a rolling boil and toss the veg in for about 2 minutes, just enough time to get them hot and bright green. Drain the water off and transfer to a pan containing the hot oil... saute for a few minutes before adding the vinegar. This takes less than 5 minutes and should be done right before serving.
Sorry for the poor picture quality... used my phone and the lighting was dim... *sigh*
The meal was super flavourful and tasty. And the best part was that it was healthy! Happy Eating!

Homemade Creamy Tomato Basil Soup

If you know me, you know soup isn't my thing. Sure, I can appreciate a good soup but I like my foods to FEEL substantial and like I'm really getting something good. With that said and the understanding that I am trying to eat foods that are more clean and homemade, I decided to try making a soup. My inspiration came from a recipe I'd seen online but I didn't follow that recipe... I made up my own... so, yup, this is all me! I've included approximate measurements ( since it's just me, it's a small recipe but I got about 4 servings out of it)... and like all cooks will tell you, use your own judgement and tastebuds to tell you if you need more or less of something.

You will need:

1 small can of tomatoes
1 white onion (finely diced)
1 carrot (finely diced)
2 cloves of garlic (finely minced)
1 glug of olive oil (just enough to saute the onion etc in)
1 tsp balsamic vinegar
1 tbsp fresh basil finely chopped
1/3 cup of cream (this is optional of course)
700 ml of chicken stock (use veggie stock if you want)
salt and pepper to taste
1 pinch of oregano
1/4 cup grated parmesan cheese

So I started off by heating up the oil in my soup pot (yup... made it all in one pot because I hate to do unnecessary dishes)

Once the oil was hot, I dropped in the onion and garlic, turning down the heat and letting them sweat a little. Then I added my oregano, vinegar and carrot. I let those saute together for a little while before adding the can of tomatoes which I also allowed to cook (soaking up those yummy garlic and onion flavours into the tomato).
Next came the chicken stock. I brought that to a boil and then let it simmer for about 30 minutes before adding the basil (basil can be a little delicate and I wanted that flavour to shine through). I brought it back to a boil and then broguht the heat down low to stir in my cream and cheese.

And that's it! It was so easy... and it tasted better (of course) the next day (if you know me, you know I HATE leftovers... but this soup... well, I ate it for 3 days and could have eaten it for 3 more days!).

Happy Eating!

Sunday, January 15, 2012

Bacon, Eggs, Toast....

... does it get any better for breakfast? YES IT DOES!!! I've recently become addicted to the website pinterest.com. I don't know if you've seen it, use it or even heard of it but it's a great way to share the things you love with people and to learn about new things. I have a board on their called NOM NOM... it's all about FOOD. Not too longLink ago I saw a friend pin something to her food board that intrigued me so I pinned it to mine. It was a Martha Stewart recipe for breakfast. They are called Bacon, Egg and Toast Cups and they looked amazing, so I gave them a try.


Just click on the link above to see how to do it step by step. I made some little variations to mine in order to suit my flavour palate( Chipotle Tobasco, smaller pieces of bacon and fresh, shaved Parmesan on top). I also slightly overcooked mine (I got distracted by laundry and dishes and didn't keep close enough of an eye on them to bake just until the whites set). They were DELICIOUS and I think it's something you could do with kids (so easy to assemble) and yet they look all fancy, schmancy so you could do them for a brunch and really impress friends.

Happy Eating!

Monday, January 2, 2012

My Kind of Carbonara

Having just got back from Italy, I still crave the delicious food there and want to be able to make some on my own. On of my favourite pasta sauces is the incredibly UNHEALTHY but DELICIOUS carbonara. I love the rich creaminess and the bacon... oh the bacon!! ;) So since I have some of that deliciousness in my freezer and I know how to make a simple cream sauce I went ahead and made it with some little twists.

You will need:

bacon (mine is frozen so it's easy to chop and you don't need to measure, just as much as you think you'd like... I guess I had about a handful of chopped bacon - enough for 2 people)
a pat of butter
about 1 1/2 cups of milk
1 tablespoon of flour (as a thickening agent, although if you can't have wheat or gluten, you can use whatever alternative works best for you)
1 egg
tabasco (I used the Chipotle one so that I could have that smoky flavour... so yum... and this you need to add to your own spice specifications)
a dash of oregano and a dash of basil and a dash of fresh garlic
cooked pasta for 2

I started by sauteing the bacon in the butter until the butter was brown and the bacon got crispy.

I also sauteed the herbs and tobasco in at this point.

Then I added the milk and flour that were already combined with each other. Now you have to stir constantly.

In went the egg, still stirring...

Now in goes the cooked pasta, still stirring...


Plate it up and EAT!! YUMMMMMY!!!!

Smoothie Madness

I know I've posted about smoothies before but I haven't been really that good at actually making them Typically I like to have a smoothie for breakfast and in the mornings I am often too tired or slow moving to actually make the smoothies and then the fruit goes off so quickly here since it is picked ripe as it's grown within Turkey and there is no need to pick it early and let it ripen. So, long story short, I never end up making smoothies I love so much... so I came up with a simple solution (even for a teeny tiny freezer such as mine): make the fruit and yogurt part up, bag them and freeze them. That way in the mornings all I need to do is throw the contents of the baggie in the blender with a little juice or soy milk and instant, HEALTHY breakfast!! YAH. Here is what it looked like to do this:


It was great fun because I got to play with a lot of different flavour combos, no two baggies is alike and there are 8 of them... that's a lot of yummy breakfasts for me!!

Happy Eating!